Git Like a Pro: Essential Git Workflow Guide for New Flutter Developers
- AUTHOR
- Ayaan Haaris
- READING TIME
- ~ 25 min read
- PUBLISHED
- Feb 13, 2025
I remember my first few months as a Software Developer. Git was just a way to save my code—a glorified backup system.
My commit messages were a stream of "updated stuff," "fixed things," and the occasional "please work 🙏."
It worked fine when I was building solo projects. Until it didn't.
The breaking point came when I had to track down a bug that broke our production app.
Scrolling through vague commit messages like "final update" and "more fixes" felt like searching for a needle in a haystack.
What's worse? I wrote those commits just a few weeks ago, and even I couldn't understand what had changed.
That's when I realized: I wasn't really using Git—I was just saving files with extra steps.
Here's the thing: Git is more than just a save button for your code. It's your project's time machine, your collaboration superpower, and sometimes, your last line of defense when things go wrong.
But nobody teaches you the "professional" way to use Git when you're learning Flutter development.
This guide is for you if:
- You're building Flutter apps solo but want to level up your Git game
- You're about to join your first dev team (congratulations!)
- You're a self-taught developer ready to collaborate with others
- You've been using Git, but your workflow feels... chaotic
I'll walk you through the Git workflow I wish I knew when I started – the same one I now use in my professional work.
No complex jargon, no "just read the docs" dismissals, and definitely no git-shaming. Just practical, real-world Git strategies that work for Flutter developers.
What we'll cover:
- Creating commits that actually make sense (and help you debug issues later)
- A simple but powerful branching strategy that won't make your head spin
- Managing app versions without losing your mind
- Working with other developers without stepping on each other's toes
- And more practical tips I've learned the hard way (so you don't have to)
IMPORTANT
Prerequisites: You should know the basics of Git (commit, push, pull). If you can make changes to a repo, you're ready for this guide.
If not, check out GitHub's Git basics guide first, then come back here.
NOTE
There are many Git workflows out there – from Git Flow to Trunk Based Development – and every team adapts these to their specific needs.
The workflow I'm sharing here isn't the "only right way," but rather a battle-tested approach that's both easy to learn and robust enough for most Flutter projects.
Think of it as your starting point that you can later modify as your team and projects grow.
Moving Beyond Basic Commits
If you're like me, your first Git commits probably focused on just getting the code saved.
But as projects grow and teams expand, those quick "fixed stuff" commits become a liability rather than a help.
Why Random Commit Messages Don't Work in Teams
Random or vague commit messages might seem harmless when working solo, but they create several problems in a team environment:
1. Debugging Becomes a Treasure Hunt
When something breaks in production, your commit history is often the first place the team looks. Compare these two scenarios:
# Scenario 1: Vague Commits
fixed some stuff
updated UI
more fixes
final version

# Scenario 2: Clear Commits
fix: resolve null pointer in cart total calculation
ui: update product card layout for better accessibility
fix: handle network timeout in checkout process
feature: implement Apple Pay integration
With the first scenario, you'll spend precious debugging time opening each commit to understand what changed.
Whereas the second scenario tells you exactly where to look.
Imagine your product manager asks: "When did we add the push notification feature?".
With structured commits, a simple git log --grep="notification" would tell you exactly when and what changed.
Poor commit messages create a form of documentation debt.
While the code might work today, understanding why certain decisions were made becomes increasingly difficult as the project grows.
TIP
Start improving your commit messages today, even if you're working solo. It's much easier to build good habits before joining a team than to change bad habits after.
Now, let's look at how to structure your commits to avoid these problems and create a history that actually helps you and your team.
Introduction to structured commits
Structured commits follow a simple but useful format that makes your Git history both readable and searchable. The basic format is:
type: concise description of what changed
Common Commit Types
Here are the most common types you'll use in Flutter projects:
Common types:
feature: New functionality or componentsfix: Bug fixes or error correctionsdocs: Documentation updatestest: Adding or modifying Tests
Optional types:
style: Changes to UI styling, formatting, or themesrefactor: Code changes that neither fix bugs nor add featureschore: Routine tasks, dependency updates, that doesn't modify the source code.
Common types are more than enough for most Flutter projects. Optional types are there to help you be more specific in-case your project gets more complex.
TIP
Keep your commit types lowercase and consistent. While some teams use different conventions (like FEAT or Feature), consistency within your project is what matters most.
Flutter Examples
Let's walk through a real-world example of how structured commits tell the story of building a feature in your Flutter app.
Imagine you're implementing a shopping cart feature. Here's how your commit messages might look:
# Step 1: Initial feature setup
feature: create basic cart screen with app bar and list view

# Step 2: Core functionality
feature: implement add/remove items from cart
feature: add cart total calculation logic

# Step 3: UI refinements and error handling
style: improve cart item card layout and spacing
fix: handle empty cart state with placeholder message
fix: prevent negative quantities in cart items

# Step 4: Polish and optimization
feature: add slide-to-delete gesture for cart items
refactor: extract cart calculations to separate service
style: implement loading states for price updates

# Step 5: Testing and documentation
test: add unit tests for cart calculations
test: add widget tests for cart item interactions
docs: add comments explaining discount logic
If you've noticed, each commit addresses one specific aspect:
# ❌ Bad: Mixing concerns
feature: add cart screen and fix login bug and update colors

# ✅ Good: Single responsibility
feature: create basic cart screen with app bar
fix: resolve login validation error
style: update primary color scheme
If the cart total calculation breaks, you can easily find the relevant commits using git log --grep="cart" and fix it.
Team members can understand:
- What changed (
feature,fix, etc.) - Why it changed (clear descriptions)
- The progression of changes (logical order)
TIP
When working on a feature, try to commit whenever you complete a logical unit of work. Don't wait until everything is perfect – smaller, focused commits are easier to understand and safer to revert if needed.
Best Practices for Commit Messages
- Be Specific: Include enough detail to understand what changed without looking at the code
# ❌ Bad: "fix bug"
# ✅ Good: "fix: handle empty API response in product listing"
- Keep it Focused: Each
commitshould contain related changes
# ❌ Bad: "feature: add login screen and fix cart bugs and update colors"
# ✅ Good: Make separate commits for each change
- Use Present Tense: Write as if you're giving commands
# ❌ Bad: "fixed the login screen"
# ✅ Good: "fix: resolve login screen validation issues"
IMPORTANT
If you're joining an existing team, check their commit message conventions first. Some teams might use different formats or additional requirements (like ticket numbers).
Setting Up VS Code for Structured Commits
You can use your IDE's Git commit template feature to make following the conventions easier. Most IDEs like VS Code and Android Studio support this.
Here's how to set it up in VS Code:
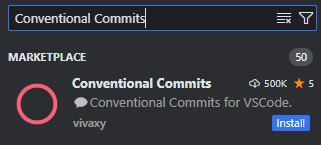
- Install the "Conventional Commits" extension by Vivaxy
- Using the extension: - Open the Source Control panel (
Ctrl+Shift+GorCmd+Shift+G) - Click the "+" icon to stage your changes - Click the "✓" (Commit) button - The extension will prompt you to: 1. Select the type of change (feature, fix, etc.) 2. Enter your commit message 3. Optionally addmore details
NOTE
There are several well-established commit conventions out there, like:
After years of Flutter development across various project sizes, I've found that the structured approach we're using here hits the sweet spot: it's simple enough for new developers to adopt, yet robust enough for professional projects.
It borrows the best parts of formal conventions while staying practical and approachable.
As your team grows or needs change, you can easily extend this base format with additional requirements like scope, breaking change flags, or ticket numbers.
Organizing Work with Branches
Consider this common scenario: You're implementing a dark mode feature in your Flutter app when an urgent bug report comes in about profile picture uploads crashing in production.
Without proper branching, you'd have to either:
- Commit incomplete dark mode work, or
- Stash/discard your progress to fix the bug
This is where branches become essential. They allow you to:
- Keep your dark mode work isolated in a feature branch
- Create a separate bug-fix branch from your stable code
- Fix the critical issue
- Return to your feature work seamlessly
Sounds great right? Let's learn how to make this workflow your daily reality.
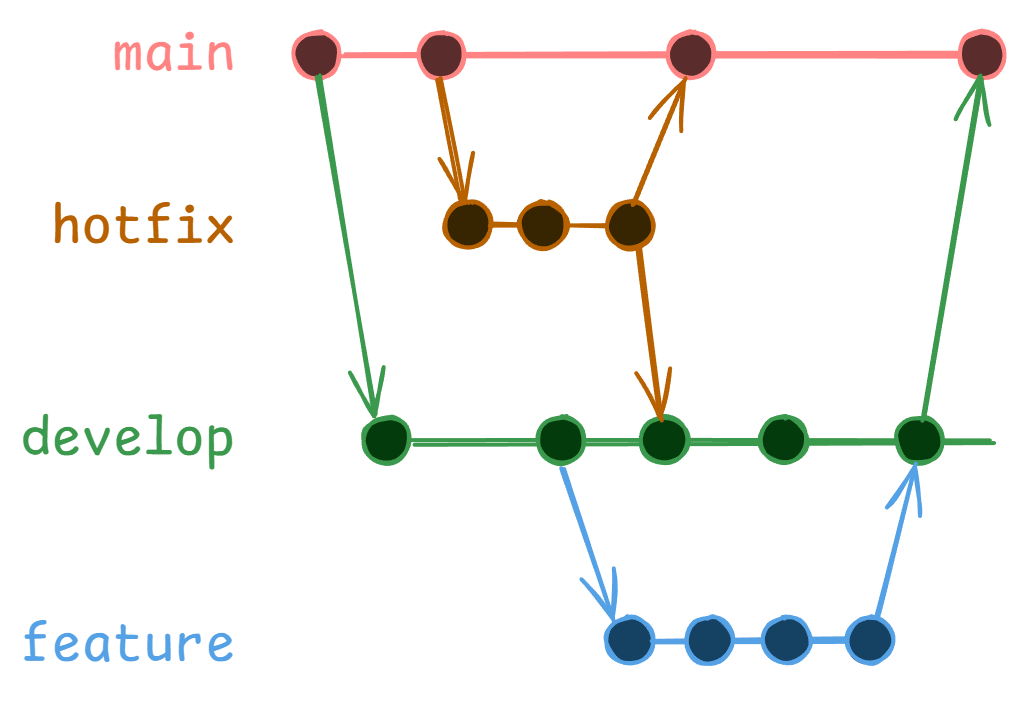
A Simple but Powerful Branching Strategy
IMPORTANT
I assume that you're familiar with the basics of branches in Git. If you're not, check out the GitHub Git basics guide first.
There are several popular Git branching strategies out there:
- Git Flow: A robust but complex workflow with multiple branch types (master, develop, release, feature, hotfix)
- Trunk-Based Development: A minimalist approach where most work happens in the main branch
- GitLab Flow: A simplified Git Flow that adds environment branches (production, staging, etc.)
While these are great for huge teams, I'll share a simpler approach that works wonderfully for most Flutter projects – a streamlined version of GitHub Flow.
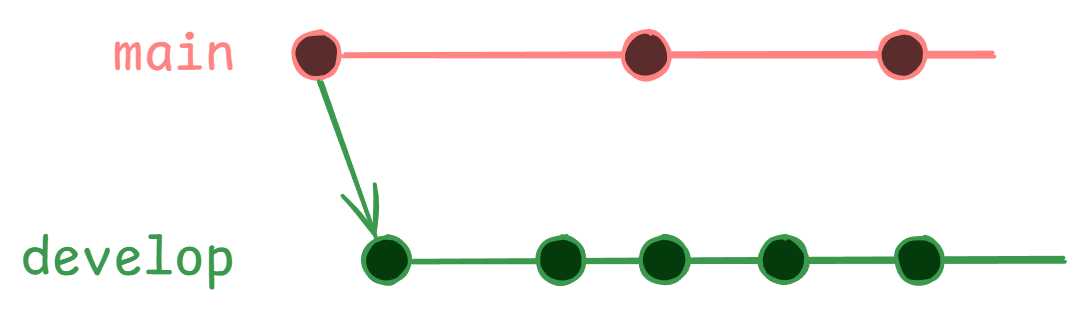
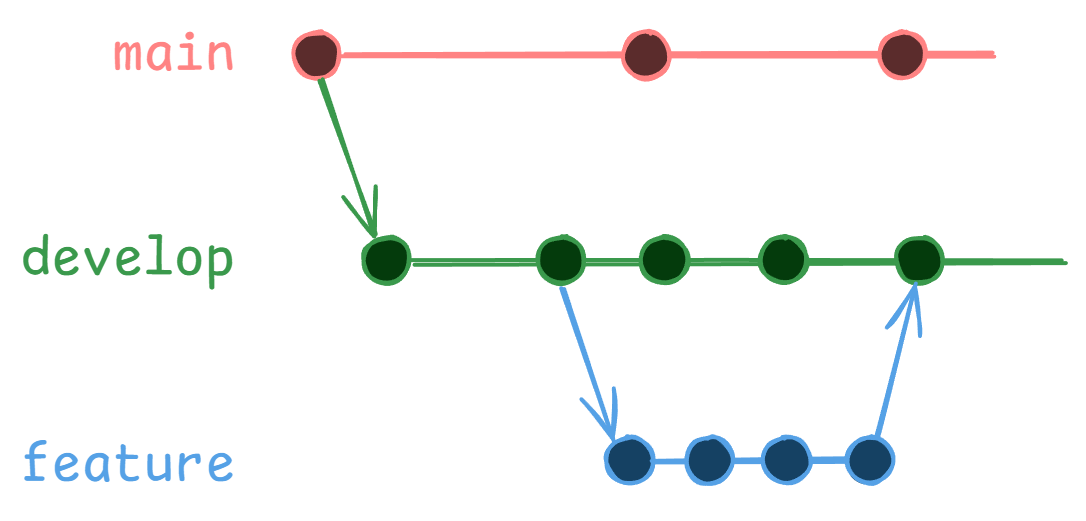
Here's the big picture:
Main Branch (
main)- Your production-ready code
- What your users are currently using
- Never commit directly here
Development Branch (
develop)- Your integration branch
- Where all features come together
- Your "next release" version
Feature Branches (
feature/*)- For new features and enhancements
- Should be created from
developbranch - Example:
feature/dark-mode,feature/push-notifications
Hotfix Branches (
hotfix/*orfix/*)- For emergency fixes in production
- Should be created from
mainbranch - Gets merged to both
mainanddevelop - Example:
hotfix/crash-fix,hotfix/security-patch
Now, let's dive into how each of these branches works in detail.
The Main Branch: Your Source of Truth
Think of your main branch as your app in the real world.
It should always contain production-ready code that you could release to users right now.


Two golden rules for the main branch:
- Never commit directly to
main - Every commit in
mainshould be deployable
NOTE
Some teams call this branch master instead of main. The name doesn't matter as long as everyone on your team uses the same one.
The Develop Branch: Your Integration Point
The develop branch is where all your ongoing development comes together.
Think of it as your "next release" branch.
# Create develop branch from main
git checkout main
git checkout -b develop
The develop branch serves as:
- A staging area for new features
- A testing ground for integration
- The source for your feature branches
Feature Branches: Where the Magic Happens
Every new feature gets its own branch, created from develop. This isolation lets you work without affecting others or the main codebase.
Name your feature branches descriptively:
# Good feature branch names
feature/user-authentication
feature/dark-mode
feature/push-notifications

# Not so good names
feature/john-work
feature/new-stuff
feature/update
Here's how to work with feature branches:
- Create a new feature branch from
develop:
git checkout develop
git pull  # Always start with latest changes
git checkout -b feature/dark-mode
- Work on your feature, making focused commits:
# Make changes...
git commit -m "feature: implement theme switcher"

# More changes...
git commit -m "feature: add dark mode colors"
git commit -m "test: add unit tests for theme switcher"
git commit -m "docs: Add docs for theme switcher and dark mode"
- Merge your feature branch back to
develop:
# First, switch to develop and pull the latest changes
git checkout develop
git pull

# Then, merge your feature branch into develop
git checkout feature/dark-mode
git merge develop
Hotfix Branches: Emergency Fixes
Sometimes you need to fix a critical bug in production immediately. This is where hotfix branches come in.
Unlike feature branches, hotfix branches are created from main:
git checkout main
git checkout -b hotfix/crash-fix
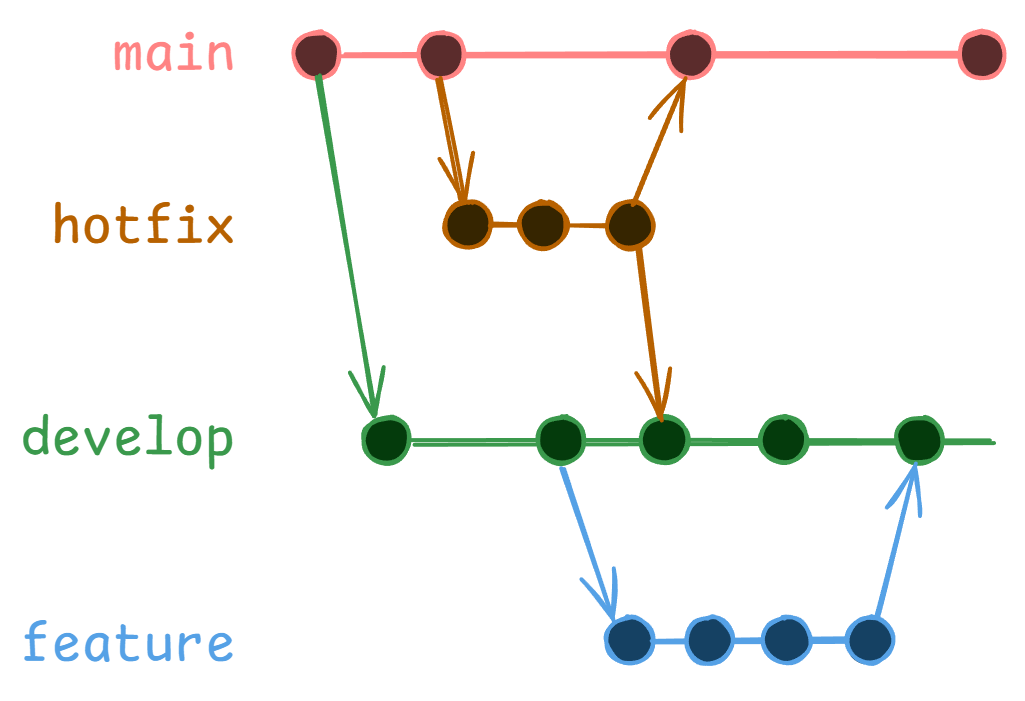
After fixing:
- Merge into
main(to fix production) - Merge into
develop(so future releases include the fix)
Putting It All Together
A Real-World Example: Adding a Shopping Cart
Let's walk through a complete example of how this branching strategy works in practice.
We'll implement a shopping cart feature and handle some real-world scenarios along the way.
Starting the Feature
- First, create your feature branch from
develop:
git checkout develop
git pull  # Always get latest changes
git checkout -b feature/shopping-cart
- Start implementing the cart with focused commits:
# Add basic cart structure
git commit -m "feature: create basic cart screen with app bar"

# Add core functionality
git commit -m "feature: implement add/remove items from cart"
git commit -m "feature: add cart total calculation"

# Polish the UI
git commit -m "style: improve cart item layout"
git commit -m "feature: add slide-to-delete gesture"
Handling a Bug Report Mid-Development
While working on the cart feature, your team reports a bug in the product listing screen:
# Save your cart work
git add .
git commit -m "wip: save cart progress"

# Create a fix branch from develop
git checkout develop
git checkout -b fix/product-list-crash

# Fix the bug
git commit -m "fix: handle null product images in listing"

# Create PR and merge to develop
Back to the Cart Feature
Return to your cart implementation:
git checkout feature/shopping-cart

# Get latest changes including the fix
git merge develop

# Continue cart development
git commit -m "feature: add checkout button"
git commit -m "test: add cart total calculations tests"
I hope this example helps you understand how branches can be used to manage your codebase.
Managing App Versions
Every Flutter app has a version number in its pubspec.yaml file that looks something like this:
version: 1.2.3+4
You probably already know that this follows semantic versioning (MAJOR.MINOR.PATCH) and the +4 is your build number that increases with each store release.
NOTE
If you need a detailed guide on Flutter app versioning, check out the official documentation on versioning.
The challenge isn't understanding version numbers – it's managing them effectively across your development workflow. This is where Git tags come in handy...
Git Tags: Your Release Checkpoints
Think of Git tags as sticky notes in your project's history book.
While commits are like writing daily journal entries, tags are like marking important chapters with a bookmark.
When you tag a commit, you're essentially saying: "This exact version of the code is special – it's a release!"
They're particularly useful because:
- They're searchable and meaningful (
v1.2.3vs commit hash8f4d9a3) - They're immutable (unlike branches)
- They can include release notes and descriptions
- Most Git platforms automatically create release pages from tags
You can create tags for:
- Store releases (
v1.2.0) - Release candidates (
v2.0.0-rc.1) - Hotfix releases (
v1.2.1)
NOTE
While Git supports both simple and annotated tags, always use annotated tags (git tag -a) for releases as they store important metadata and release notes.
You can learn more about tags in the official Git documentation.
A Practical Tagging Workflow
Let's walk through a real-world example of releasing a new version of your Flutter app:
Prepare Your Release
# Update your version in pubspec.yaml
version: 1.2.0+12  # New feature release

# Commit the version update
git commit -m "chore: bump version to 1.2.0"
Create Your Tag
# Create an annotated tag (preferred over simple tags)
git tag -a v1.2.0 -m "Release v1.2.0 (build 12): Added dark mode and push notifications"
Push Your Tag
# Push your tag to remote
git push origin v1.2.0
IMPORTANT
Always create tags from your main branch. Tags mark released versions, and releases should only come from your main branch.
Best Practices
Match Tags with App Version
# pubspec.yaml
version: 1.2.0+12

# Matching Git tag
git tag -a v1.2.0 -m "Release 1.2.0 (build 12): <release notes>"
Tag Release Candidates (for major releases)
git tag -a v2.0.0-rc.1 -m "Release candidate 1 for v2.0.0"Include Meaningful Messages
# ❌ Bad: No context
git tag -a v1.2.0 -m "New version"

# ✅ Good: Clear description
git tag -a v1.2.0 -m "Release v1.2.0: Added dark mode, push notifications, and fixed checkout crash"
Pull Requests: The Heart of Collaboration
Pull Requests (PRs) are a fundamental mechanism for code review and collaboration in modern software development.
They provide a structured way to propose changes, gather feedback, and ensure code quality before integration into the main codebase.
Understanding Pull Requests in Your Workflow
Remember the branching strategy we discussed earlier? Pull Requests are where that strategy comes to life.
They're not just a formality—they're your opportunity to ensure code quality, share knowledge, and grow as a developer.
When I first started with Software development, I viewed PRs as an unnecessary bureaucratic step.
But they serve crucial purposes whether you're in a team or working solo:
- Knowledge Sharing: PRs become learning opportunities through code reviews and discussions
- Quality Control: Team reviews catch issues early, from
setState()misuse to potential memory leaks - Documentation: PRs document not just what changed, but why—context that becomes invaluable over time
- Professional Growth: Even in solo projects, PRs help build good habits and can showcase your workflow to potential employers
TIP
When working solo, try to wait at least a few hours between creating your PR and merging it. This "cooling off" period helps you review your code more objectively.
Creating Effective Pull Requests
Let's me show you how PRs work in a professional Flutter team setting.
Learning this will also come in handy when you want to contribute to open source projects.
I'll share the templates and practices I've found most effective across different projects.
Basic PR Workflow
Let's walk through creating a Pull Request step by step:
- Prepare Your Branch
# Make sure your feature branch has all changes committed
git status  # Should show "nothing to commit"

# Update your local develop branch
git checkout develop
git pull origin develop

# Switch back to your feature branch and merge develop
git checkout feature/shopping-cart
git merge develop
Fix any merge conflicts if they occur
- Push Your Branch
# Push your feature branch to remote repository
git push origin feature/shopping-cart
- Create the Pull Request
- Go to your repository on GitHub/GitLab/BitBucket
- You should see a prompt to "Create Pull Request" for your recently pushed branch
- Click "Create Pull Request"
- Set the following:
- Base branch:
develop(where your changes will go) - Compare branch:
feature/shopping-cart(your changes)
- Base branch:
- Fill Out PR Details
Your team might have a PR template already setup. Fill it out if you have one. If not, you can use this one:
## Changes

- Added shopping cart screen
- Implemented cart total calculation
- Added unit tests for cart logic

## Type of Change

- [x] New feature
- [ ] Bug fix
- [ ] Performance improvement
- [ ] Documentation update

## Testing

- Added unit tests for CartService
- Tested on Android 13 and iOS 16
- Verified cart calculations with different scenarios

## Screenshots/Videos

[If UI changes, add before/after screenshots]

## Checklist

- [x] Tests added/updated
- [x] Documentation updated
- [x] Verified on both Android & iOS
- [x] No new warnings/errors
- Request Reviews
- Add relevant team members as reviewers
- If working solo, take a break and review it yourself later with fresh eyes
- Address Feedback
If you were given feedback, you can address it by committing the changes and pushing to the branch.
# Make requested changes
git commit -m "fix: address PR feedback for cart calculations"
git push origin feature/shopping-cart

# The PR will update automatically
- Merge When Approved
- Wait for approvals from reviewers
- Ensure all checks pass (tests, lint, etc.)
- Click "Merge Pull Request" (or let reviewers merge it)
- Delete the branch after merging (most platforms offer this option)
TIP
Always review your own changes in the PR interface before requesting reviews. You'll often catch small issues that weren't obvious in your editor.
Enforcing Branching Strategy
In the branching section, we discussed how changes from feature or fix branches should flow through the develop branch before being merged into main.
Pull Requests (PRs) play a crucial role in enforcing this branching strategy.
By configuring branch protection rules, you can ensure that:
- Code can only be merged through PRs (no direct pushes)
- PRs must target the correct branch (
developfor features) - Required reviews and checks must pass before merging
You or your team leader can configure your repository to enforce these rules.
Check out this helpful guide on how to do it: Enforce Branching Strategy
IMPORTANT
Configure your repository settings to enforce these rules. Don't rely on memory alone.
NOTE
When reviewing PRs, start with the big picture before diving into implementation details. Architecture issues are more expensive to fix later.
Receiving Feedback Professionally
Working in a team means you'll be receiving feedback on your code. Some of them will be polite, some of them will be blunt.
Handling feedbacks professionally is key to building a positive reputation among your teammates.
Be Open-Minded
- Every comment is an opportunity to learn
- Ask questions if you don't understand
- Take technical discussions offline if needed
Respond Constructively
# ❌ Don't for god sake 😂

"This works fine on my machine..."

# ✅ Professional

"Thanks for catching that. I'll add null checks and test on different devices."
Giving Feedback Professionally
Giving feedback is a skill that comes with time and practice.
Here's my 2 cents:
Be Specific and Constructive
# ❌ Vague

"This code needs improvement"

# ✅ Specific and helpful

"Consider using ListView.builder here for better memory management with large lists"
Focus on Code, Not Person
# ❌ Personal

"You always forget to add error handling"

# ✅ Code-focused

"This section would benefit from error handling for network failures"
TIP
When giving feedback, use the "sandwich" approach: start with something positive, provide constructive criticism, end with encouragement or next steps.
I learned this from my class teacher 😊 while I was in college.
Keeping Track with Issues
If commits are your project's history and branches are your workflow, then issues are your project's to-do list.
Issues help you:
- Track bugs that need fixing
- Plan new features
- Organize team discussions
- Create a roadmap for your project
But here's the thing: issues aren't just for big teams.
Even for solo projects, they're incredibly valuable. I use them essentially as an alternative to Trello or clickup.
Think issues as cards in a kanban board. You can create issues for:
- New features
- Bug reports
- Documentation updates
- Refactoring
- Chores
- Ideas
Creating Effective Issues
Let's look at how to create issues that actually help you and your team. Here's a basic template I use for bug reports:
## Bug Description

[Clear, concise description of what's wrong]

## Steps to Reproduce

1. Open app
2. Go to [screen]
3. Tap on [element]
4. Observe [unexpected behavior]

## Environment

- Flutter Version: 3.x.x
- Device: iPhone 14 Pro
- OS Version: iOS 16.2

## Additional Context

- Screenshots/videos if applicable
- Relevant error messages
- Any temporary workarounds
For feature requests, I use this simpler template:
## Feature Description

[Clear description of the proposed feature]

## Why is this needed?

[Explain the value this feature adds]

## Proposed Implementation

[Optional: High-level technical approach]

## Acceptance Criteria

- [ ] Criteria 1
- [ ] Criteria 2
- [ ] Criteria 3

## Additional Context

- Mockups/designs if available
- Related features/dependencies
TIP
You can set up issue templates in your GitHub repository so these are automatically loaded when creating new issues. Check out GitHub's guide on issue templates.
Organizing Issues with Labels
Labels help you categorize and prioritize issues. Here's a simple but effective labeling system I use for my projects:
Priority Labels
p0: Critical (production blockers)p1: High priorityp2: Medium priorityp3: Low priority
Type Labels
bug: Something isn't workingfeature: New functionalityenhancement: Improvements to existing featuresdocumentation: Documentation updates
Area Labels
ui: User interface changesperformance: Performance-relatedtesting: Test-related tasksci: CI/CD pipeline issues
NOTE
Keep your label system simple at first. You can always add more labels as your project grows and patterns emerge.
Linking Issues with Code
GitHub has powerful features to connect your issues with your actual code changes.
Here's how to use them effectively:
1. Mention Issues in Commits
When you make a commit that's related to an issue, include the issue number in your commit message:
# Add issue number at the end of commit message
git commit -m "fix: correct cart total calculation (#42)"

# Or mention it in the description for multiple issues
git commit -m "fix: update cart logic

- Fixed total calculation (#42)
- Fixed quantity validation (#43)"
This creates a clickable link in GitHub between your commit and the issue.
2. Auto-close Issues from Pull Requests
You can automatically close issues when your PR is merged by using special keywords in your PR description:
# PR Description Example

Fixed cart calculation bugs

- Fixes #42
- Closes #43
- Resolves #44

Changes:

- Updated cart total calculation
- Added validation for negative quantities
When this PR is merged, GitHub will automatically close issues #42, #43, and #44.
TIP
Any of these keywords will work: fixes, closes, resolves, followed by the issue number with a #
3. Link Branches to Issues
Optionally, you can include the issue number in your branch name:
# Format: type/description-issue_number
git checkout -b fix/cart-calculation-42
git checkout -b feature/dark-mode-57
This makes it easy to:
- Find which branch is working on which issue
- Keep track of work in progress
- Reference the original issue when looking at branches
NOTE
These links work best when you're using GitHub's interface. If you're using GitLab or Bitbucket, they have similar features but might use slightly different keywords.
Example Time
Let's say you're building a shopping app and users report that the cart total is incorrect.
Here's how we use issues for this:
- Create a Bug Issue:
## Bug: Cart Total Calculation Incorrect

### Description

Cart total shows wrong amount when adding multiple items with discounts

### Steps to Reproduce

1. Add "Premium Headphones" ($100) to cart
2. Apply 20% discount code "SUMMER20"
3. Add "Wireless Charger" ($30)
4. Observe total (shows $104, should be $110)

### Expected Behavior

Total should be: ($100 \* 0.8) + $30 = $110

### Actual Behavior

Total shows $104

### Environment

- Flutter: 3.16.0
- iOS 16.2 / iPhone 14 Pro
- Android 13 / Pixel 6

### Additional Context

[Screenshot of cart with incorrect total]
- Create a Fix Branch:
git checkout -b fix/cart-calculation-157
- Reference in Commits:
git commit -m "fix: correct discount calculation in cart total (#157)"
- Close via PR:
Fixes #157

Changes:

- Updated CartService to apply discounts per item
- Added unit tests for discount calculations
- Added integration test for cart total
This workflow creates a clear trail from problem report to solution.
The process is same for feature requests issues, documentation updates issues, etc.
Conclusion
We've covered a lot of ground in this guide! Crafting meaningful commits to managing branches, handling pull requests, and organizing work with issues.
I hope you found this guide helpful.
❤️ Bookmark This Guide
Save this guide for reference!
So you can always come back to refresh your memory or learn more about specific aspects of Git workflow.
😁 Share the Knowledge
If you found this guide helpful, please share it with your fellow Flutter developers!
The more we all understand Git best practices, the better our codebases and collaboration will be.
Additional Resources
Here are some excellent resources for you to learn more about Git:
- Pro Git Book - The comprehensive guide to Git
- GitHub Flow Guide - More about GitHub's workflow
- Conventional Commits - Detailed commit message conventions
- Flutter's Official Version Guide - More about versioning Flutter apps